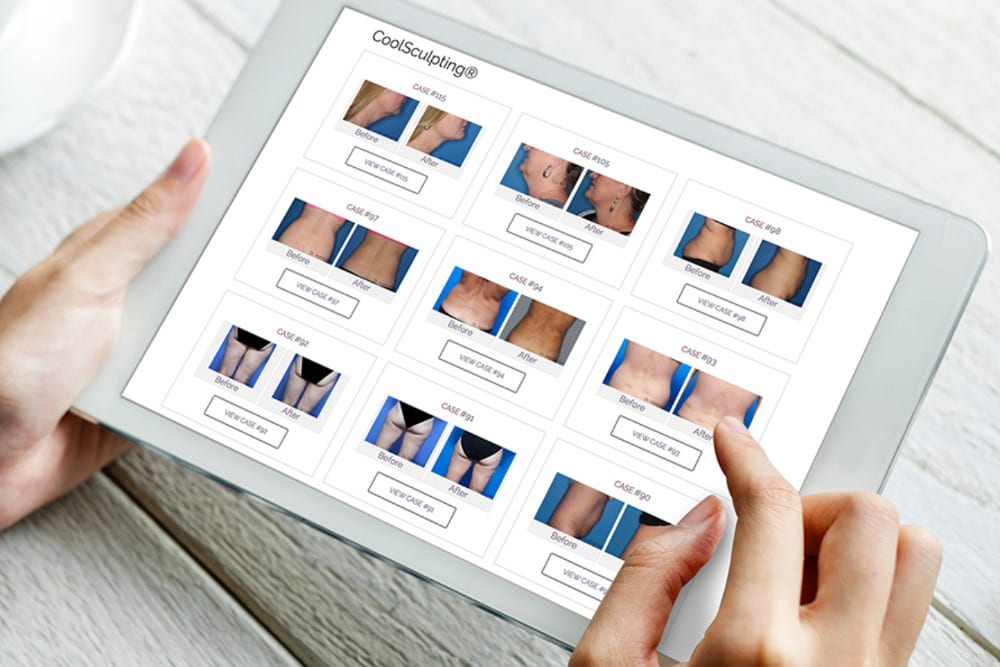
If you’re a cosmetic practice marketing online, you better as heck know that your patient photos are digital gold. You need two things to make them pay off: an online gallery with the features and functionality users expect, and photos themselves that show how much of a rock star you are.
We’ve built a custom WordPress photo gallery for our clients that offers extremely fast loading, an intuitive user interface that makes it easy to view cases quickly, and the ability to blow up and zoom in on images for more detail. So the road to the championship comes down to the work you put in making your photos themselves the stuff of legend.
Here’s what you need to do to make the most of your online photo gallery:
-
Consistent Images
This one is the whopper – you have to get it right, and there are more variables here than on your 7th grade algebra tests.
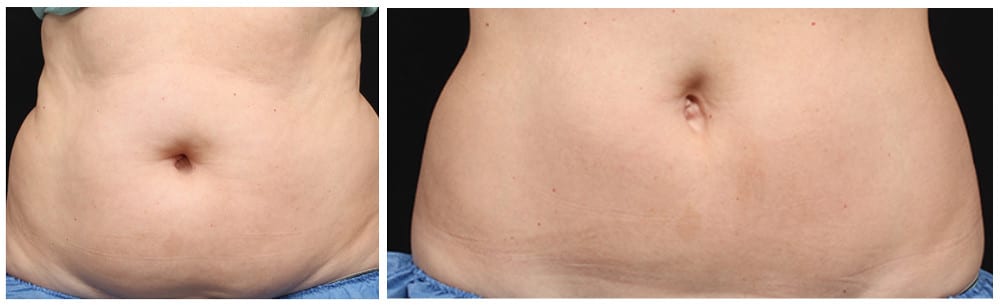
Same Lighting: If you’re taking photos in a room affected by natural light, reconsider your life choices. Or at least this one. Your photo sets will look much higher quality if they all have the same lighting, and that means your ability to control it completely. And by same lighting, we don’t mean some creepy single bulb overhead like a James Bond interrogation scene. Ditch the fluorescents if possible and use bright white LED overhead lighting. If you really want to go pro, pay a local photographer to come in and consult on your lighting setup.

Uh, I think she looks better? Same Equipment: Almost any smartphone these days will give you a pretty good snap, right off the shelf. But everyone has different settings to adjust for light, resolution, etc. So it’s unlikely that two different devices will give you a totally consistent image, even if you control for all other variables. Don’t be a cheapskate – spend the dough to buy a nice digital camera for the office and make sure only it is used for snapping patient photos. This has the added benefit of minimizing the risk of patient photos on your staff’s individual devices falling into the wrong hands.
Same Room: If you have the space, dedicate a room where you can take before and after photos. This way you don’t have to move furniture or equipment out of the way, adjust or set up lighting, etc. If your office space is at a premium, find a private area (ideally in a consult room) with a large amount of wall space where you can at least set up a background free of utility plugs, wires, light switches, artwork and other distractions that will screw up your background. We find that a white or very light/neutral wall tends to work best for photos.
Same Orientation: We see it more often than we’d like – a before photo taken with a portrait orientation and an after photo taken with a landscape orientation. Sure, you can crop the images fairly easily, but in some cases, a portrait photo may be cropped too tightly and you’ll have to cut the corresponding landscape image dramatically to make it look right. Make life easier and always take photos with the same orientation (which should be portrait in most cases).

Close, but no cigar. Pull Up Befores When Taking Afters: But teacher, this one is HARD! Too bad, it’s critical. You’ll never be able to get the angle of your ¾ profile shots to match up or be sure that you have the right poses if you don’t have the photos you took before the patient’s procedure right in front of you. It might be easier to get away with this for nonsurgical procedures where a patient was just in last week. But who remembers what all went down 3 months ago before this woman standing naked in front of you had her mommy makeover? Pull up her images and keep them handy as you take after shots.
Crop It Like It’s Hot: Even if you’re very consistent when snapping photos, you’ll still want to do some light rework on some. Remember: NEVER retouch photos in a way that changes what the patient results look like. What we’re talking about here is cropping images so that they are as comparable as possible. Resizing the image. Brightening or darkening one image slightly so it matches better. Rotating a patient whose head was tilted just a bit in her after photo. Stuff like that which is minor but really bumps up the quality of your photo sets.
-
Big Images
It’s hard to believe how many thumbnail sized images make their way into surgeons’ before and after galleries. What kind of device even takes low quality pictures like this anymore? It’s kind of like that part in Jurassic Park – “Life finds a way.” Except here, “lousy photos find a way.”
Take your pictures on a modern camera or smartphone that gives you images that are several thousand pixels in both dimensions. Don’t shrink down photos so that they’ll fit in an email to your web vendor. Instead, use Dropbox or a similar file sharing service so that your high-quality images can be maintained.
-
Feature Your Best Cases
Sure, all your patients are special, but some are more special than others. When you have a case you’re really excited about, find a way to convey that to staff, so that they can add the case as a featured one right at the top of your gallery (or have your web vendor do it).
Really amazing looking results are prime contenders here, but it also can be worth featuring very technically challenging cases, and explain in the case description what makes the case such an achievement.
-
Protect Privacy
This should go without saying, but of course you need to get permission from all patients before displaying their photos, even if their faces won’t be shown. Be sure to hide any identifying features, like tattoos or jewelry. To avoid any accidental exposure of PHI, it’s best practice not to label images with patient names. Our photo gallery uploader will change all images automatically to random file names, but you can never be too careful.
-
Create a Guidebook
With all the things happening day in and day out at your practice, it’s easy to get sidetracked. You’re your staff to take the best possible pics by setting up a guidebook. It certainly shouldn’t be book-length – 1-2 pages should do the trick as an easy reference. We find that a physical copy located right in the spot where you take pictures can be the best solution.

What all needs to be in it? Well, everything we’ve covered here so far. You also might want to outline a preferred format for image file names and detail where images should be stored. Do you want staff to upload images as soon as afters are taken? Or does it work better to go through all your photos from the week and get them organized?
Take a first stab at your guidebook and let staff know that there’s always room for suggestions and improvements. As long as you find a process that works and stick to it, you’ll be in great shape to take high-quality photos and be in the best place to have those photos work hard to bring even more patients your way.